Monday, July 29, 2013

In a Pickle- Half Sour Pickles from the garden

Every summer I dally with pickling, usually cukes... though there was that period that I was obsessed with the perfect chow-chow... then there was the crabapple ketchup. This summer, I'm giving half sour pickles another go. My pickle muse and guide is a blog I have been following for a while called Nourishing Days. Shannon also blogs for Cultures for Health.

So I was inspired by Shannon to try half sours again. My last experiment started to scare me when the pickling liquids turned cloudy and formed a "scum". By the way, as a Southerner, I know about vinegar based pickling, which requires boiling water baths for canning- cloudy and scum equals tossing out food or becoming very sick. Historically half sours are not tackled in the south, because it is so hot that they "sour" quickly. But as the south is typically air conditioned indoors, I'm going with it.

I decided to keep the small batch (one jar) of pickles next to the air conditioning vent- cold and relatively dark. I am growing two kinds of cucumbers in the garden, so both are in the jar for the first harvest. You can find great recipes with measurements at Cultures for Health, so I will not need to reproduce their recipe here. I used the one that required tree leaves for crispness- I went with oak from the front yard and washed them carefully!

~~~ * ~~~ * ~~~ * ~~~

Here is my pictorial essay of the pickling process. By the way, I tried them after about a week and they were delish. Thanks, Shannon!

Cukes, salt, dill, peeled garlic, peppercorns, red pepper flakes and some little oak leaves on my favorite cutting board.


Layering the herbs in the bottom of the quart jar.


Last layer. Topping the cukes with dill, oak leaves, peppercorns and red pepper flakes.


Pouring the brine.


Lovely jar of future pickles!

So, cucumbers, dill, and oak leaves from the yard/ garden, peppercorns and red pepper flakes from Penseys, garlic from the store... future crunchy pickles, indeed!
 
*** This post has been reposted from www.BergereChair.blogspot.com, my interior design and green living blog.
No claims are made about this, or any content, follows the exact tenants of the Paleo diet. Please use your own judgment when choosing the foods that follow your paleo diet and how you preserve foods. Please use the link about for cultures for health to find the full recipe and an explanation on why there are oak leaves in my jar of pickles!

Wednesday, April 17, 2013

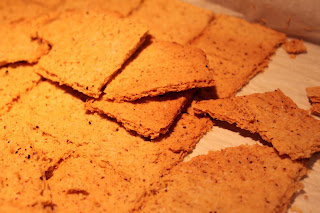
Garbanzo bean crackers

Oh Crackers... how I miss you! But paleo life says no. How can I make myself happy and stick with my plan? Beans... pureed, seasoned, and baked, maybe....

So, here's my go at homemade crackers. Light, flaky, delicate crackers... like pie crust, but nutty. Just beans, no gluten, no cereal, no problem!


Garbanzo beans are up for debate in the Paleo diet world. However, beans agree with me, and my doctor said they are good. So as I really miss crackers with my salad, I went on a quest for a bean based cracker with out any cereal grains. In the pantry I had a few types of flours- coconut, almond, amaranth, and flax- not really a flour but looks like one. I wanted to add a nutty flavor, so I went with almond and flax.


Garbanzo (chickpea) crackers

Ingredients-
16 ounce of organic garbanzo beans- drained and rinsed
1/4 cup of flax seed meal
6 tablespoons of almond flour
1/2 teaspoon of salt
1/3 cup water (varies with humidity)
1/4 cup olive oil
1/2 teaspoon baking powder

Equipment-
food processor
oven
offset spatula
baking sheet
parchment paper

Add rinsed and drained beans to you food processor and process for 5 seconds.
Add to food processor half of oil and pulse a couple of times.
Add to food processor flax meal, almond meal, and salt. Pulse a couple of times.
Add to food processor water and rest of olive oil.
Process for 2 minutes and scrape sides down as needs. You are looking for a smooth paste.

Once processed, remove mix from processor bowl into mixing bowl and add the baking soda. Stir to incorporate and turn out onto a parchment lined baking sheet. With an offset spatula, spread dough as smooth as possible. The smoother and more even the dough, the more even the browning.

Score the dough into squares and dock. Add salt and pepper to taste. Bake at 350 degrees for 20 minutes to until brown. Once browned, lift the parchment, with crackers on top to a cooling rack. Crackers will be delicate because without gluten, there is little strength to the cracker.

You can change up the top seasoning to include garlic, chili powder, sesame seeds, etc.

None of my recipes are tested, professionally. I am a home cook, all be it a foodie. This recipes is not necessarily part of the official paleo diet.

term used:
pulse- pushing the pulse button down and release
offset spatula- a spatula, used in the cake industry, with the blade about and inch lower than the handle.
score- with a knife or spatula draw lines into the door as guide for breaking the crackers when done. I like to score all the way to the pan.
dock- using a fork, poke holes in each cracker. It prevents the cracker from rising too much.

Monday, March 18, 2013

Energy snack- chocolate, pecan, and fig


If there is three things I love, it is chocolate, pecans and figs. I recently purchased an "energy snack" at a local health food grocer. They seemed like a good idea for a quick bite to keep in your purse when you have to time for lunch. They were chocolate and sunflower seeds. However, the sunflower seeds were not toasted and they lend the "snack" a rather stale flavor.

So, I struck out on my own to create a better version without strange stuff and with more flavor!


Chocolate, Pecan, and Fig Energy Snack

12 dried figs, cut in quarters
1/2 cup chocolate chips
1/3 cup of pecans, toasted
2 tablespoons of ground flax seed
2 tablespoon honey
3 pieces of candied ginger (optional, and not strictly paleo due to the sugar)

 
Place figs, pecans, flax and ginger in a food processor and process until very finely chopped. Once processed, remove the fig mix to a bowl. Add chocolate to the food processor and chop until the pieces are half their size, then add them to the fig mix.


Add the honey to the fig mix and stir together.
Once mixed, form the mixture into 3/4 inch balls and let them sit for an hour to firm up.


The balls will be sticky. So, you could roll in exterior of your choice, chopped nuts, toasted coconut, or simply cut in squares and wrap in parchment.


In summary:


Advisements- This recipes is untested, and contain nuts.

Sunday, February 3, 2013

Cheese biscuits- Paleo off day recipe

This is a Paleo "off day" recipe. Sunday morning is my "off the rails" breakfast day!

I do not understand why restaurants serve sweet cheese muffins and call them cheese biscuits. For me, biscuits are as much the shape, as they are the ingredients list with a grounding in the concept of a scone. I have long been a fan of the Cooking Light Ham and Cheese Scone recipe. In theory, this is a riff on that biscuit.

What I learned from that recipe is that the shortening in a biscuit does not have to be solid fat- Crisco, coconut oil, etc., but it can be a food with oil, like cheese.


Cheese Biscuits

serves 3-4
heat over to 400* or convection to 390*

2 cups sifted self rising flour (White Lily Brand flour, if you can find it.)
2 ounces of cheddar cheese (I used raw milk cheddar from Organic Valley)
milk
coconut oil to grease the pan

Grease cookie sheet and pre-heat oven.
Add the flour to your mixing bowl and grate the 2 ounces of cheddar into the flour.
Mix.
Add milk... and here is where you become the chef. The humidity in your house, thus your flour, will dictate the amount of milk you need. Also, what you want your biscuits to look like will dictate the amount of milk. I'm lazy and I prefer to make drop biscuits, so I mix in enough milk to that consistence. If I were to roll them out, I would use a bit less milk. If I use too much milk, I have what I call toaster biscuits- as in they are big and flat and can be reheated in the toaster.
Mix milk with flour mixture and drop onto the greased cookie sheet. About 8 biscuits should fit on a quarter sheet pan. The can touch and will rise a bit higher if they do touch.
Bake for 10-15 minutes until browned. Serve hot!

Though not Paleo, this recipe does exclude hydrogenated nut or seed oil and the flour is a low protein/ low gluten flour.

Variations on a theme~ add chopped ham, green onions, or garlic powder to taste!

 
This recipe has not been tested and makes to claims to the accuracy. Please test all recipes before trying them on friends. This is not a Paleo diet recipe.

Friday, January 18, 2013

Paleo Beef Stir Fry

On my Paleo path I am creating recipes that follow the guidelines and, I think, tastes good! I struggle with recipes that are "plain" without many spices. I am considered rather a foodie among my friends. I want Paleo to taste like foodie food. Here is another recipe on my quest!

Paleo Beef Stir Fry
Serves 2

(pics to come)

Ingredients-

1/2 pound of boneless beef short ribs
1/2 of a red bell pepper cut into 1/2 inch strips
1/4 of a green bell pepper cut into 1/2 inch strips
1 small white onion
1 tablespoon roasted garlic
1/4 teaspoon of sesame oil (Paleo iffy, I know)
1 teaspoon of soy sauce (Paleo iffy, I know)
coconut oil for cooking

How to-
Add some coconut oil in your skillet over medium heat, whatever amount you usually saute with. I add about a 1/4 teaspoon.
When the oil is hot, but not smoking, add your bell peppers and onions
Cook for about 5 minutes, shaking pan often.
While your veggies are cooking, trim your short rib pieces and cut into long 1/2- 1/4 thick pieces... thin enough to coo fast, thick enough not to injury yourself cutting it.
After 5 minutes has passed and your veggies are browned, place them aside in a bowl and add your meat to the skillet... not touching and cook quickly on both side until browned.
While your meat is cooking mix the sesame oil, soy sauce and roasted garlic in a bowl.
When your meat is browned on both sides add your veggies back into the skillet and give it a shake to incorporate.
Add your sesame soy garlic mix (it will be think so you might have to scoop it out and dab it around)
Add just enough water to your sesame soy garlic bowl to swish it around and get all the goodies out, then pour that over the meat and veggies.
Stir together and left some of the water steam out until everything has a light coat of the mix.

Serve and enjoy.

tips, additions, and amendments-
You can substitute green beans instead of all the bell pepper.
If you do not use soy or sesame, try whatever your normally substitute.
Chill your meat to make it easier to cut.
Buy twice the meat you need and use the est cut into strips for No Tortilla Fajitas

Disclaimer-
These recipes are intended to be guides, measurements can be altered to suite your taste, and they have not been professionally tested.